Monday 22 April 2013

Raised Beds & Hopes

Saturday & Sunday
20 & 21/04/2013

Katie, Dwayne & Angharad

The Saturday was a glorious day spent in the sunshine
(suncream is on the shopping list)
Firstly we began to complete the covering of the poly tunnels floor to suppress the weeds

Here are Katie and Angharad adding the woodchippings to complete the suppression,
it was uncomfortably warm in there, but at least we know that the tunnel will work well once its complete.

We had a wonderful surprise later in the day when Grahame Howard of Howard Handy Man Services, rang to say that he had finished making the beautiful raised beds he has produced for us free of charge!!

He sourced the timber from Travis Perkins in Llanishen, the beds are made from railway sleepers which Travis Perkins very kindly donated to Grahame so he could make us some, very much needed, raised beds for the poly tunnel. Fantastic!

Thank You very much for your generosity Grahame Howard & Travis Perkins, from everyone at FareShare.  


Here are Grahame & Dwayne getting the rasied beds into the poly tunnel


http://www.howardhandymanservices.moonfruit.co.uk/

The rasied beds were rather large (and heavy) they measured 8ft by 4ft and we hauled them carefully into the tunnel, that was a lot of hard back breaking work.

Here they are 

(they are bigger than my bed)

Other jobs we carried on with were the general maintenance of the plot, it was a bit windy during the week and blew the felt off the shed and broke a window, so we had a tidy up in the shed, fixed the roof and window. One of the jobs that is taking a while is the path edging, we allocated a lot of free wooden planks but due to their previous life we had a lot of nails to remove to make them usable.
.

Once the planks were ready we carried on edging the paths in kind of straight lines.


url.jpg


Thursday 11 April 2013

Steaming Heaps of Compost

Wednesday 10/04/13

Liz, Katie & Dwayne

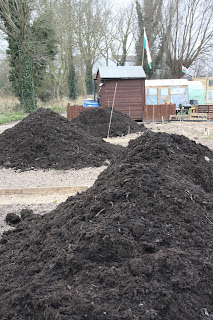
Corr we had a delivery today of compost, about 18 tonnes apparently
if you want to know what that looks like, it looks like this

Liz put here car here for scale, she doesnt look impressed
(We got used to the smell)


Our plan was to spread the compost over the top of the plots and then turn it in to improve the condition of the 'well rested' soil, to hopefully break down some of the clay qualities.

Here is Liz attacking a pile with what looks like a makeshift gasmask

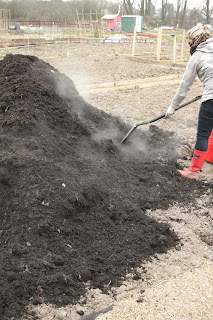
And here is Katie spreading it out in the rain, which didn't make it any easier


This is towards the end of the evenings actives the compost was so hot that it was still steaming as we spread it out over the ground!

Monday 8 April 2013

Further Construction and Planting

Saturday 6th of April
Volunteers Austin, Katie, Liz & Dwayne (who joined later)

It was a very busy day down the allotment today with the emphasis on planting out all the bulbs in the Amaryllidaceae family, which to you and me are onions and shallots.

Firstly we used a bulb dibble tool to make a hole which we packed compost into to help replenish the soil and to give the bulbs something to grow into as the ground is still fairly hard.
We then planted out in rows following a combination of instructions from helpful neighbours the bulb packets and the trustworthy books.


We planted a couple of hundred bulbs in total with loads more still to go!!

To aid identification we improved the signage for the plants (sorry crops still learning the lingo)
we spray painted names onto off cuts and cut them at an angle so they are easy to stick in the ground.

They do look rather splendid...


The main job of the day was to complete the next step of the poly tunnel which wrap it in its polythene casing, this was a job for eager volunteers and we are just that.

It was a mighty job and we didnt understand how much work it would turn out to be
see it doesn't look like a lot of plastic, oh how wrong we were...............
what we had to first was to cover the metal frame it hot guard tape which stops the plastic from melting to the frame.
It look a lot of effort to get the tape on straight (well in a line)

Once the  frame was  prepped it was time to commit and get the covering on, so we placed the polythene in the middle of the frame and slowly folded out the plastic.
(the hand is there just to grab the polythene if it tried to blow away)

Katie and Austin giving a sense of scale to how big it actually is

The next task was to get the plastic frame nice and tight so we had to bury the plastic in the trench we had previously dug and the soil would provide a large weight which would pull down and keep the polythene nice and tight, this took a lot of effort as we had to get out all creases or folds and we did this by starting in the middle and working our way to the corners.
 When we got to the ends of the tunnel we buried in the trench shuffling the plastic around to create a nice tight tension, and fitted the door frames.

Here is the nearly completed poly tunnel with us still working hard as the sun sets behind us.

Once the door frames went in we just cut out the plastic to the doors and this is how we left it at about half eight in the evening